The Tale
This tale begins with my Bottlehead S.E.X. amp and a friend commenting that now I’ve built an amp maybe I should build some speakers. That one quip has led me down the trail of building these speakers and I hope you get some insight on my project and encourage you to build your own.
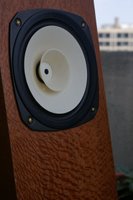
I spent countless hours cruising web pages in search for a project that had suitable specs. for my Single Ended eXperimenters (S.E.X.) amp, a speaker design that seemed like I could fit them into my living room without damaging the WAF (Wife Acceptance Factor) too much. Then my search led me to the Fostex website – studying the response curves of their drivers, their excellent assortment of speaker plans etc. Finally, for whatever reason, I chose the Fostex 207E as the driver. In hind sight I suppose the choice was the relatively flat response, the entrance into the beloved 40Hz range, and the electromagnetic shielding that did it for me. After investing in a driver I didn’t want to end up with speakers that put my cordless phone and television on the fritz. With the driver chosen I did a search on the internet for existing plans in hopes of finding a fellow DIY’er that has figured everything out for me.
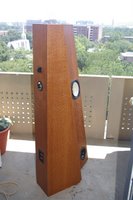
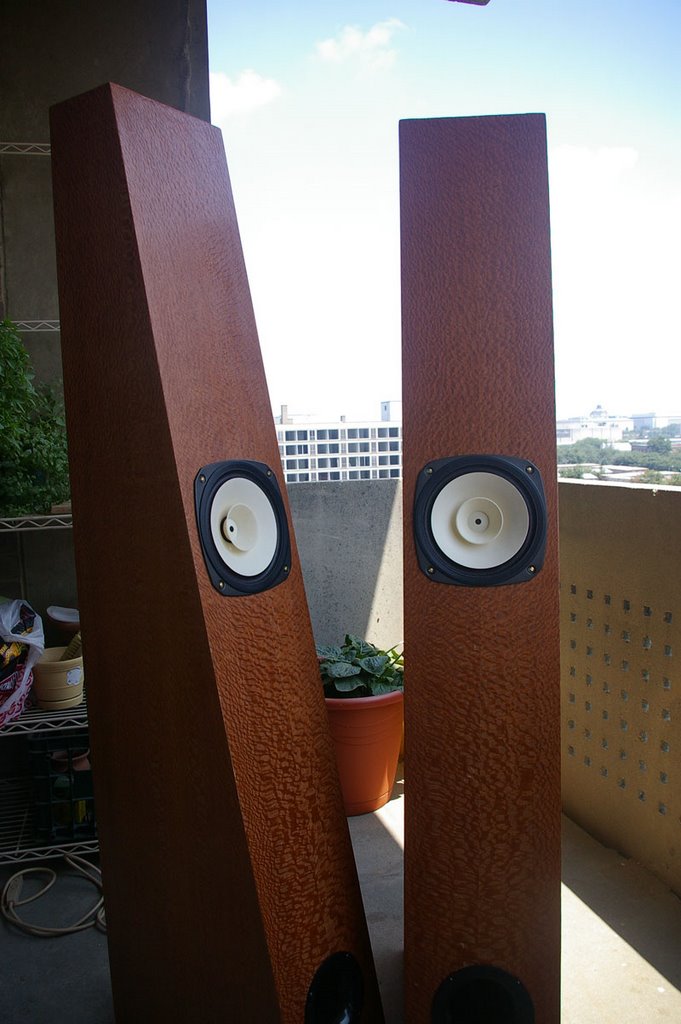
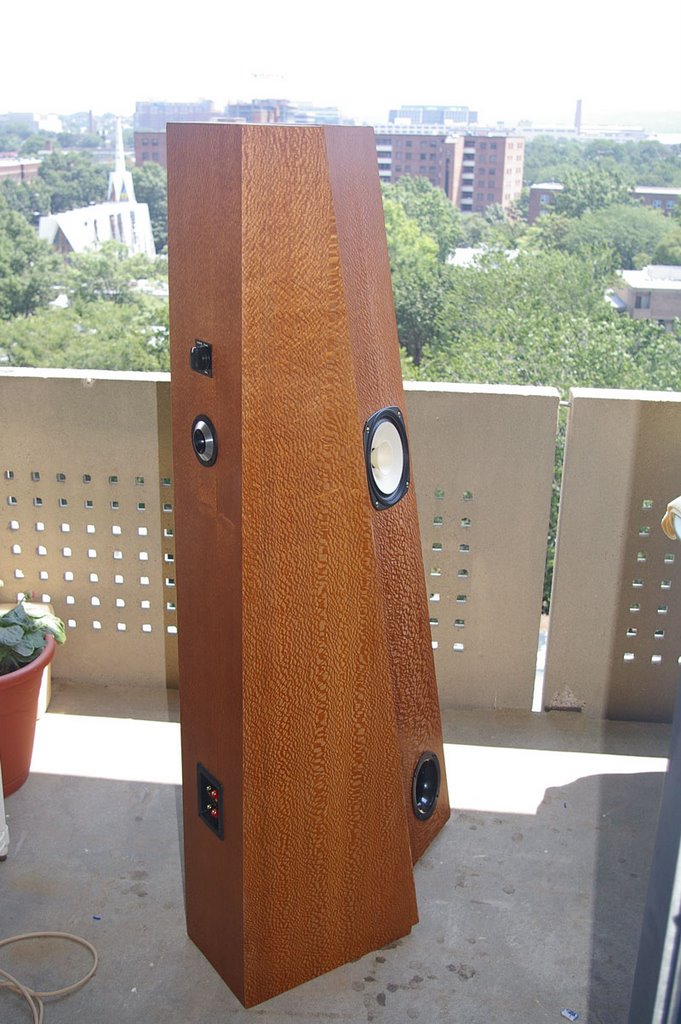
The speakers and the design began with the information found at http://www.pi.algeriaaudio.com/. Buried in the pages was a Fostex design using the FE207E and the Fostex recommended super tweeter. The design used a pair of book end matched speakers with the driver on the largest side. I was preferential to the look of the Cain-Cain Abby and choose to put the driver on the slanted face instead.
A good friend of mine had me go demo a pair of Von Schweikert speakers which had a rear firing tweeter. I was captivated with the air it gave the room and thought it would be a good idea to try this approach here. After digesting all the web chatter about the bright response from the Fostex drivers – I figured that the rear firing tweeter would help soften the highs from the whizzer cones too.
I attempted to run the totally overwhelming math cad spreadsheets from Martin King’s quarter wave web site and put in my own figures for this design. All in all it was a good lesson in how little I know and how smart others are. Basically the numbers and response curve didn’t seem to suggest that I was doing anything too terrible and off to the drawing board I went.
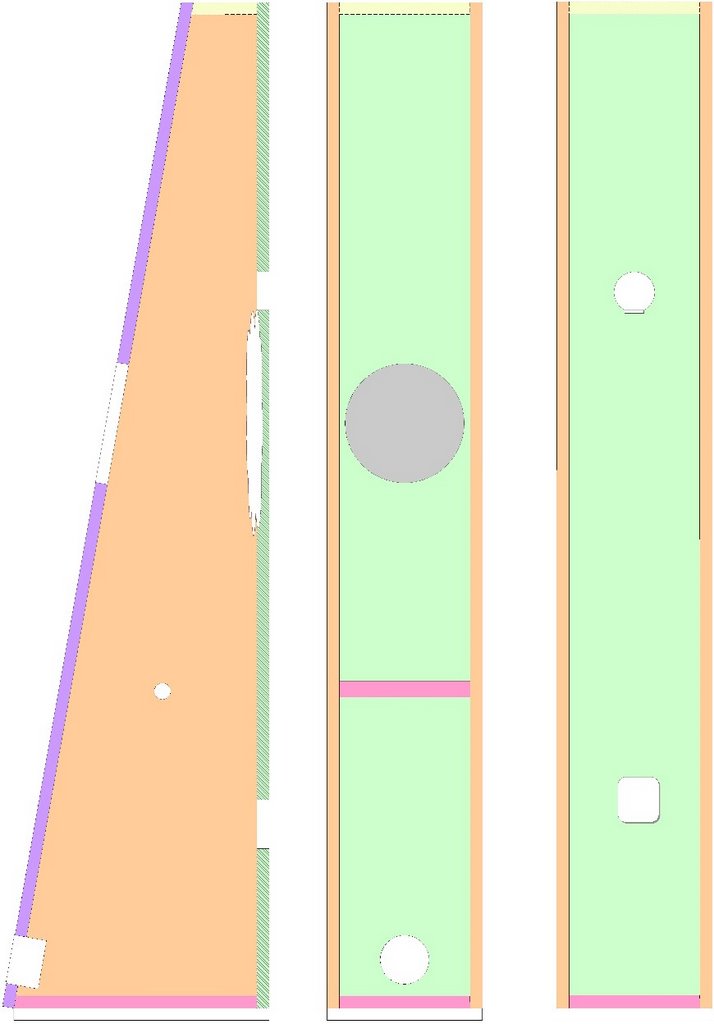
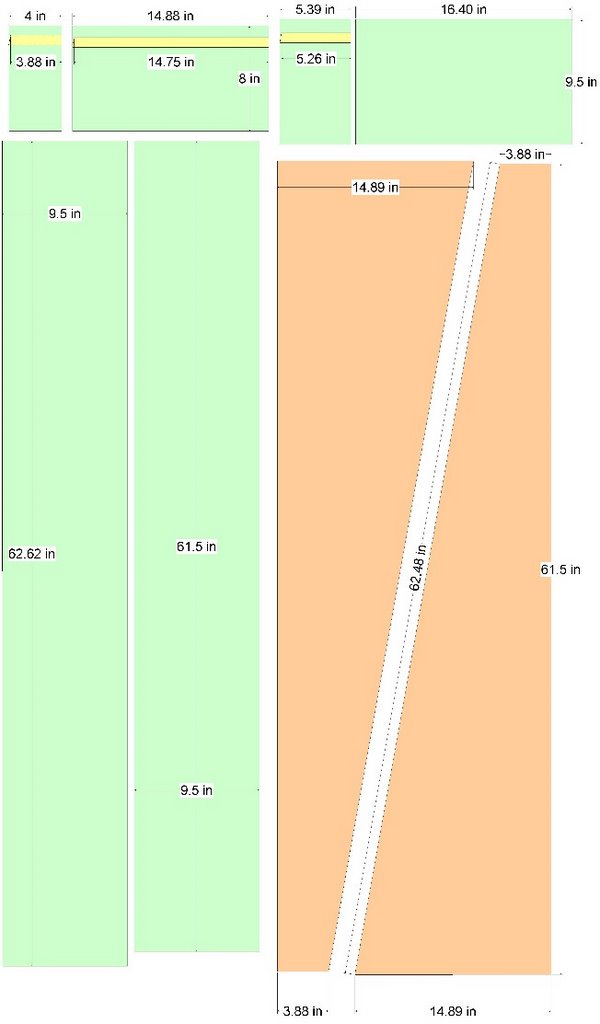
Not having any real drawing software I ended up using a copy of Autodesk Actrix (their version of Visio) to draw the plans. If you are interested, they can be downloaded here in .jpg (p2). TAKE NOTICE – something’s off with the plans as the original version I thought I was doing had the face of the baffle to the floor – in the as built version it’s cut short of the base. As I recall it was a bit short of making the base so instead of scrapping the otherwise well fit front baffle I trimmed it short. I like the detail but I didn’t correct the plans – or maybe the plans are right on the money for this effect and I measured/cut wrong. Who knows – they are what they are. Costs and Parts Lists are available in excel if you ask.

I have a VERY small work area and even smaller tool storage ability. In all my work area was about 5’x8’ so the notion of saw horses, dust free paint shops, and bunches of clamps etc. was out. To this end I ended up having the MDF cut by a pro and I stuck to assembly. I countersunk and tapped before screwing the panels together, gluing the joints when I was happy with the fit up. Even with that precaution there were of course mistakes. Fear not – BONDO saved the day. One of the rear panels went on about a 1/8” off center – leaving a ridge on one side and a gap on the other. A wood rasp to knock down the big stuff and some bondo and everything was “true enough” to veneer.
 In an attempt to increase the WAF I involved my sweetie in picking the veneer. She chose Lacewood – I was pleased. In hind sight I would have been better served to learn on something other than Lacewood. The stuff is brittle, expensive, and itchy. But boy does it finish nice.
In the end the project cost a pretty penny by DIY standards – mostly due to the Lacewood but they turned out well. They sound good – to me. There’s enough choice in tuning them that you should be able to make them sound good to you too. They sounded better when I heard them with a preamp on my system. This hobby is subjective – there is no perfect. If you like an open, crystal clear sharp high end, with a mid that’s emotional but not overbearing then these speakers are for you. If you like to thump your way through your high school and college years they aren’t for you. These speakers are for Jazz and in my opinion they do a superb job with it. Regardless, they appear to be very sensitive to twaeks so you should be able to find a happy place for your own preferences. Between stuffing, port tube length, and baffle step correction circuits you should be able to hit the sweet spot. I’ve ended up naming the speakers LP #9’s – because what could go better with S.E.X. than some love potion??
Thanks to Martin King, Paul Joppa, Terry Cain, and Tim Forman for helping answer my questions. You all are pros.
The following section describes some lessons learned that I hope you find helpful.
Lessons Learned
Screwing – I do recommend screwing - the box together. Fit the case, drill, countersink, screw, unscrew, glue, screw instead of fussing with a thousand clamps. I glued generous amounts of Elmer’s wood glue to both sides of the joint, looking for glue oozing out the sides of the box. After a minute or two to dry you can putty knife off the excess when it’s begun to turn plastic and you’re as clean as a whistle.
Wood Choice – I do recommend using MDF for the first run. The stuff is dusty, chips, cracks, and absorbs water. It sure is inexpensive though and if you’re happy – build the next ones out of plywood. It will also convince you to hone your wood working skills so you never have to use it again.
Baffle Step Correction (BSC) – I ended up not including one – principally because I only have a 2 W amp and the line level correction just stole too much of the ambiance I was striving for. Some day when I get a more powerful tube amp I’ll fiddle around with the speaker level BSC circuit recommended on Martin King’s site but for now I’m pleased without it.
Stuffing – I found the driver to like an empty box. I ended up taking out all the recommend stuffing and leaving only a small piece of polyester (blanket or chair batting) directly behind the driver (about 14” long and the width of the box) and just using a staple gun to secure it.
Room Positioning – I found the speakers to sound the best to me with a toe in so the intersection was about a yard or so in front of my couch. This seemed to take care of the BSC, brightness, and all the other offenses that the Fostex drivers are accused of having.
Speaker Vent Port Tube – I used the 3” precision port. In hindsight I would put it rear firing so there is some coupling of the bass that is produced with the rear walls. I also fiddled around A LOT with the length of the port tube (both in the math cad software and in the actual box) and found that NO extension sounded best to me. When I added any length to the port tube at all the driver lost nearly all the mid/bass and with it out completely the driver sounded sloppy. So I ended up keeping just the front throat from the precision port as the port tube.
Cutting Driver Holes – Well, nobody taught me how to cut holes with a router. So I drilled a pilot hole, stuck in the cutting bit and proceeded to drag the router around the circle I had drawn. This worked for about 4 inches until the bit began to smoke. I switched to my dremel with about the same effect. Finally I ended up hacking the hole out with my jig saw. I shared my toils with friends who are still laughing at me not using a circle cutter for my router and cutting the hole a little bit at a time working my way through the material. I’ll try that next time.
Cutting Driver Holes Too Wide – Well – so much for precision (see section above). I had chosen the hurricane nuts to use on the back side of the panel for putting the mounting machine screws into. I ended up having to bend one side of the hurricane nut up 90 degrees to get the driver into the hole. This worked like a charm and would definitely use the hurricane nut/machine screw combo again.
Internal wire – I selected some Streetwire 14 gauge stranded OFC tinned wire. I think it sounds good. No, this is not an invitation for speaker wire debate. I recommend using the female disconnects you are supposed to. When you are done with your assembly, finishing, and are putting the speakers together for the last time – solder the female plug to the speaker – it makes me feel good that it’s on there nice and tight.
Speaker Cup – Initially I thought that it would be smart to be able to take the super tweeter out of the circuit so I got a speaker cup for bi-wiring. I would not do it again as the L-Pad accomplishes the same thing and it isn’t as chincy. Who really uses bi-wiring anyway.
Spikes – I like the look – although I suspect there would be more bass if the speaker was sitting on the floor. You choose.
Box Stiffening – I ended up only using one dowel to stiffen the “middle” of the sides below the driver. I’m not sure this is worthwhile and may take it out if I do a plywood version some day.
Gauze for Retaining Stuffing – I used the eyelet screws and tied first-aid gauze to retain the stuffing while I was “tuning”. I think I like the idea of an acoustically dead material being used here instead of string. It’s a bigger surface area for the stuffing to have to leak past and is easy to stretch out of the way if you want to put more/less stuffing into the box. I ended up with no additional stuffing other than a small sheet behind the driver – again you choose with your earbuds.
Caulk – Clearly, you must caulk the seams to be sure they are air tight – problem is that I couldn’t see the top inside of the box once assembled, I couldn’t steer my caulk gun from the main driver hole…..I’m open to suggestions here. I ended up cutting a tip off a Ziploc baggie filled with caulk and hand mashing the caulk as high up as I could reach. My guess is there’s a glob of caulk stuck to the top of the box stalactite style. It’s a trade secret and I’ll call it’s the Half Assed Touch of Magic (HATM) that must make these speakers sound so good to me.
Box Material – Like I mentioned before I used MDF. I think next time I’ll use plywood. No, I will use plywood because MDF is made by the devil and sucks more than the Sahara in summer. Also, speakers like Audio Note and Cain-Cain aren’t made out of MDF – I figure they may have some clue about this that I don’t have.
Veneering – I enjoyed veneering. I used water cleanup contact cement called Weldwood and got a foam roller to put it on. I used an excess block of wood with the edge sanded a little bit to round it off as the scraping tool and it seemed to work fine – until I got to the top/bottom edge where I lost track of where the underlying box stopped but the oversized sheet of veneer continued and – CRUNCH – I rolled the veneer off the top and folded it over – leaving a splintered wreck in it’s wake. LESSON LEARNED – full scale practice on cheaper veneer. Next time I will go ahead and press like a son-of–a-bitch and leave the last 4 inches or so just pressed down with just my fingers then >>>Invest in a hand held router with a veneer trim bit (thanks to Steve). This tool ROCKS. You simply drag it around the edge and bingo – perfect edge just waiting for a quick sand. Same goes for finding the holes for the drivers after you are done veneering. Just tap with your fingers until you find the void, cut an X with your utility Knife stick the router bit in the hole, turn it on, drag it to the side and around you go. Presto perfect! To find the holes for the machine screws you may want to make a template of the layout before you veneer so you can use a hand drill to re-drill through the veneer.
Bondo – If MDF is made by satan – Bondo is God’s answer. Use it instead of wood filler – it’s faster, smoother, can be sanded out if you screw it up and re-done. Thanks Steve L. for the bondo suggestion.
Finishing – I used tung oil but I think Lacewood wants a high gloss – with less than perfect sanding to start due to the grain and lots of coats with sanding between. Next time – more gloss, more sanding.
Dowels – I didn’t want to spend another penny on more dowel just for veneering so I improvised a set of “tent cards” fabricated out of photo enlargement sleeves. I think any glossy cardboard could be used instead. This worked perfectly. Once the contact cement has dried for the recommended 40 minutes or so just lay them out and then begin to place the sheet of veneer over the work and then pull them out one at a time.